 Written by Miguel
Let’s start by answering one simple question, what is a headless CMS?
A headless CMS (Content Management System) is a content management system that allows content creators to manage and organize content. Still, unlike traditional CMS it does not include the presentation layer, in replace of this it provides a mechanism ( in many cases a REST API ) to access the content it manages.
Then, why do you need a headless CMS? The root answer to this question is flexibility, if the website project that you have in your hands requires high control of the front end(View, look and feel) yet with the capability of easy management of the content(without constant deploys ), a headless CMS is a candidate solution. In a headless CMS context, you implement the view layer of the website/app with a separate technology, it can be a SPA(single page application) with any modern framework like React JS or Vue JS or some full-stack frameworks like Remix JS, Next JS, Laravel ( for PHP )
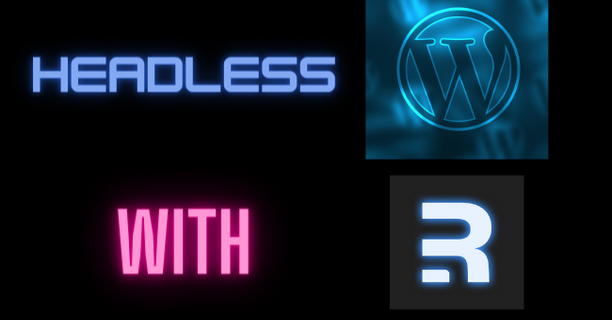
The stack that we are going to use for implementing a website using a headless CMS solution is WordPress for the headless CMS, Remix JS as a full-stack framework, and Cloudflare as web hosting
WordPress is one of the most famous ( if not the most famous) CMS that exists and it comes with an out-of-the-box REST API to access the content.
Remix JS is one of the top competitors in the JS full-stack ecosystem, is easy to learn and it is specialized in serving dynamic content.
Cloudflare is a global cloud network that provides as a key feature a high performance across its services, it comes with a free tier for its famous Workers, which are, in a few words a medium to deploy web apps in its global network.
Lets start implementing our headless CMS with WordPress at no cost.
I won’t give you a list of the best free hosting providers for WordPress, instead of that, I’ll tell you the one I consider the best option for having WordPress as a Headless CMS, which is 000WebHost, this hosting provider is actually free, downsides?
To get started you need to create an account on 000WebHost if you don’t have one, and then :
https://YOUR-WORPRESS.HOST.COM/wp-json/wp/v2/posts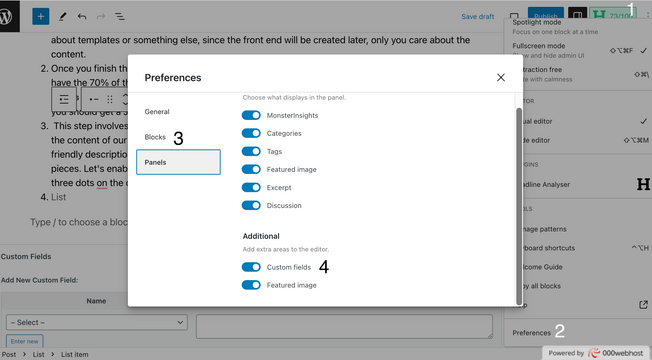
functions.php file , with the functions file open add the following code at the very end of the file content :register_rest_field( 'post', 'metadata', array(
'get_callback' => function ( $data ) {
return get_post_meta( $data['id'], '', '' );
}, ));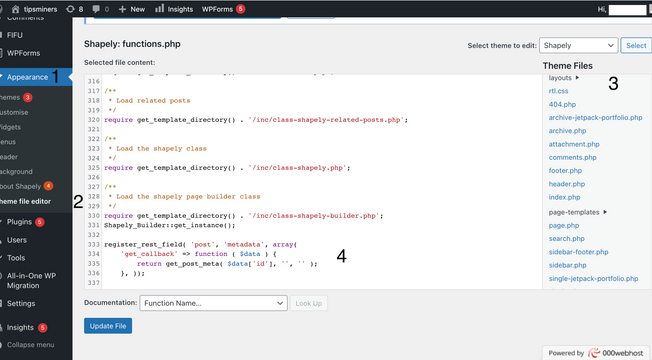
With this code you are basically telling the WordPress API to add include the field metadata to all posts, to test this out go to the post JSON object of one your articles(note to get the id of a post just look at the URL your editing screen of any post and look for the number after post= ) :https://YOUR-WORPRESS.HOST.COM/wp-json/wp/v2/posts/POSTID
In the content of that JSON you must find a "metadata" attribute.
The section is a little bit longer and code heavier, then, please grab your cup of coffee ☕️ ( or tea, I don’t mind ) to get ready. Let me tell you what I won’t cover in this article: how to style your Remix JS, how to include images from a CDN in your posts and no deep technical explanation of Remix concepts(there are not a lot ).
With the previous statements in mind, lets begin:
Create a new Remix JS project selecting Cloudflare Workers as the deploy target, to do that you need to run the following command on your shell/terminal : npx create-remix@latest
From the questions you will get ( to meet the purposes of this article) you have to answer :
TypeScript or JavaScript? TypeScript
Where do you want to deploy? Cloudflare Workers
The rest is your free choice 👌🏼
Next is about writing the functions that will consume/fetch WordPress REST API, as you can imagine there are already packages out there that can do this task, sincerely, after spending 30 mins going through the docs of some of them, I decided that for this simple task, is easier to consume directly the API with fetch calls, let’s put them under a folder /app/services/wp ( like most of the things in the JS world, this is totally up to you ) , create a file post-calls.ts, and let’s put the first API call :
export async function wpGetCategories():Promise<Category[]> {

    const categoriesResponse:any = await promisedGet(`${BASE_WP_URL}/wp-json/wp/v2/categories?hide_empty=true`);

    if(categoriesResponse.error){
        return [];
    }

    return categoriesResponse.map((category:wpCategory)=>({
        id:category.id,
        name:category.name,
        description:category.name,
        slug:category.slug,
        postCount:category.count,
    }));
}
The code above will perform a GET to the endpoint that retrieves all the categories asking only for categories that have at least one active post.
The next piece of the puzzle is the code that gets the detail of the images that are linked to a post, inside of the WordPress API this under Media Objects :
export async function wpGetMedia(mediaId:number):Promise<Media> {
const response:any = await promisedGet(`${BASE_WP_URL}/wp-json/wp/v2/media/${mediaId}`);
if(response.error){
return {
url:"",
alt:"",
description:"",
};
}
return {
url:response.source_url,
alt:response.alt_text,
description: response.description
}
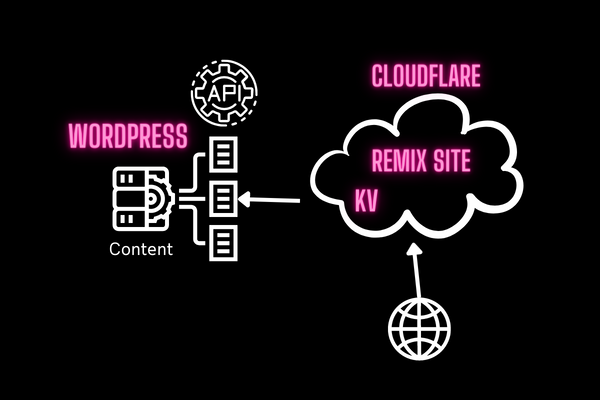
}Until now, everything is about making calls to WordPress API, and like this, your Remix App will work partially fine, why? , you have to keep in mind the downsides of WordPress free hosting, slowness, and medium availability, this will reflect in your Remix App in a negative way if no action is taken, Remix guys cover this performances issue in their very entertaining documentation, one of the solution concepts they provide is the plain ol’ caching, and that’s what we are going to do :
Since we are going to host our Remix App in the all-mighty Cloudflare Workers we can easily leverage from one of their fantastic features, Workers KV, that in a very simplistic way is a global key-value data store with low latency ( super fast ☺️), to make use of KV to cache(store) we can implement the following code :
const TTLDay = 60 * 60 * 24;

async function getCategories():Promise<Category[]>{

    const key = "categories";
    //first check if it exist on cache.
    const cachedEntry = await SITE_POSTS?.get(key);
    if(cachedEntry){

        return JSON.parse(cachedEntry);

    }else { // no cache , then make a call to get it
        const categories = await wpGetCategories();
        await SITE_POSTS?.put(key,JSON.stringify(categories),{
            expirationTtl:TTLDay
        });
        return categories;
    }
}
The code above is basically caching all categories’ responses from the function that we already implemented consuming WordPress API in the entry “categories” of the KV SITE_POSTS , but from where this SITE_POSTS variable came?
Your wrangler.toml config file is the answer to that question, this config file rules the way your Remix App behaves and deploys as a worker, to make available a KV in your app, you need to make a binding through a variable inside your wrangler config, the binding config that will make work the code above is :
kv_namespaces = [
  { binding = "SITE_POSTS", id = "a453453454564575765757a99395e" }
]
We will learn how to get the value of that id attribute in the last section of this article, for now, keep it on the back of your head.
Mixing the concept of caching and the calls to the WordPress REST API we are able to implement a function that retrieves all posts that belong to a cached category :
async function wpGetAllPosts(categories?:number[],pageSize?:number,pageNumber?:number):Promise<Post[]>{

    let qs:string = "?"
    if(categories){
        qs += `categories=${categories.join(',')}&`;
    }

    if(pageSize){
        qs+=`per_page=${pageSize}&`;
    }

    if(pageNumber){
        qs+=`page=${pageNumber}`;
    }

    const postsResponse:any = await promisedGet(`${BASE_WP_URL}/wp-json/wp/v2/posts${qs}`);

    if(postsResponse.error){
        return [];
    }

    const listCategories = await getCategories(); // this gets all the cached categories

    return Promise.all(postsResponse.map(async (rawPost) => ({
        id:rawPost.id,
        creationDate:rawPost.dtae,
        modifiedDate:rawPost.modified,
        slug:rawPost.slug,
        title:rawPost.title.rendered,
        content:rawPost.content.rendered,
        author:rawPost.author,
        categories:listCategories.filter((category)=>rawPost.categories.indexOf(category.id)>=0),
        thumb: await wpGetMedia(rawPost.featured_media)
    })));
}
How would it look like the function that gets the latest posts of a category with the backup of KV caching?
async function getLatestPostsByCategory(categoryId:number):Promise<Post[]> {
    const postsKey = `posts-category-${categoryId}`;
    //first check if it exist on cache.
    const cachedPosts = await SITE_POSTS?.get(postsKey);
    if(cachedPosts){

        return JSON.parse(cachedPosts);

    }else { // no post , then make a call to get it
        const posts = await wpGetAllPosts([categoryId],6,1);
        await SITE_POSTS?.put(postsKey,JSON.stringify(posts),{
            expirationTtl:TTLDay
        });
        return posts;
    }
}
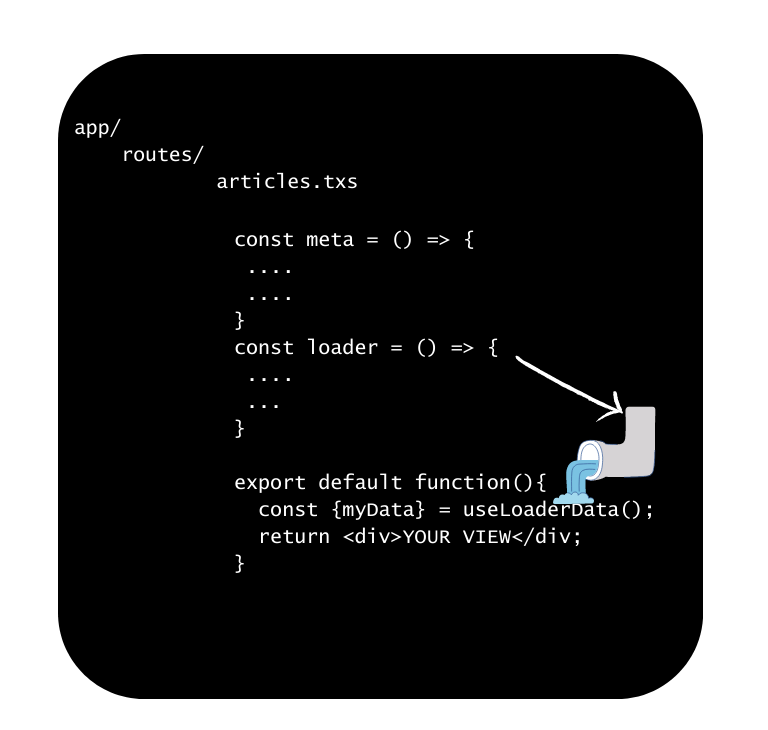
So far the code we have written does not have specific code from Remix JS its time to have fun with this beautiful framework, lets say that we want to have a link on our site that shows all the categories and per each category, we should show the lastest 6 posts, to do that on Remix we will add articles.tsx file under our /app/routes/ folder with the following functions:
meta function will set up the title of our wonderful page, besides the title you can set up meta tags for the articles route
export const meta:MetaFunction = ()=>{

    return {
        title: "My Remix App with WordPress Headless CMS"
    }
}
loader function, in charge of providing the data for our view, for folks that are used to MVC frameworks, that would be our controller, note how simple the loader function look, like most of the controllers should do
export const loader = async () => {
    const categories = await getCategoriesListing();
    return json({categories});
}
default export function is basically our view, as you see the code returns JSX component. The pipe where you get the loader data is through the useLoaderData hook
export default function (){
    const {categories}:{categories:Category[]} = useLoaderData();

    return(
        <main className='flex flex-col'>
            {
                categories.map((category:Category)=>(
                    <section className='flex flex-wrap p-4' key={category.id}>
                        <h1 className="text-5xl text-lavender mb-4 w-full">{category.name}</h1>
                        {
                            category.posts?.map((post:Post)=>(

                                <div key={post.id} className='p-4 w-full sm:w-1/2  lg:w-1/3 '>
                                        <Link to={`/articles/${category.id}/${category.slug}/${post.id}/${post.slug || 'nicearticle'}`} className='border-0   w-full  flex flex-col'>
                                        <img className='w-full h-28 object-cover rounded rounded-b-none'
                                            alt={post.thumb?.alt || ''}
                                            src={post.thumb?.url || 'https://www.stockvault.net/data/2016/03/08/186269/preview16.jpg'} />
                                        <h2 className='text-lg p-2  text-lavender whitespace-normal'>{post.title}</h2>
                                    </Link>
                                </div>

                            ))

                        }
                    </section>

                ))
            }

        </main>


    )
}
In Remix, everything that is required to serve a page/URL on a site/app lives in the route file of that page, like this, you have a cohesive architecture that regardless of the fact that can produce big route files makes development so much easier than other frameworks.
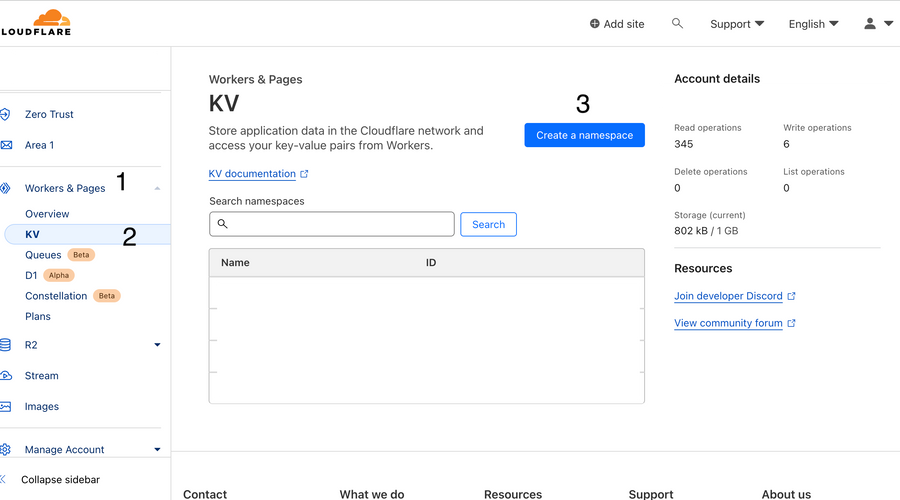
For this step, you have to have a Cloudflare account, if you don’t have one, you can create one for free.
Login into your account and select Workers and Pages over the side menu, then pick the KV option from the submenu that comes out, with this you will get to the management console of KV Namespaces, click on the Create Namespace blue button on the top right corner:

With the previous step done, we have everything ready to deploy our Remix App using WordPress as Headless CMS, someone extra you can do is set up your Remix App to use a custom domain.
npm run deployThats it !! , you made it to the end, enjoy your lighting-fast blog at no cost!!